Create a dashboard for your MQTT-based home automation system with the M5Stack Core and Homepoint
Most home automation systems have a web interface that you can use on your computer or smartphone. However, having to open your laptop or unlock your smartphone before navigating to the right web page creates unnecessary friction. What if you quickly want to see the temperature outside or close the blinds?
The solution is a dedicated device that shows a dashboard. Two years ago I bought a M5Stack Core BASIC Kit: a modular, stackable, ESP32 board with a 2 inch LCD screen, all in a package that doesn't look bad in your living room. I wrote an Arduino sketch to turn it into a dashboard for my MQTT-based home automation system: it could read the temperature and humidity of various sensors in my home by subscribing to the corresponding MQTT messages and showing them on the screen.
However, the result was quite basic, and I never really found some time to expand the system to something more usable. Recently I discovered Homepoint: open source firmware for the ESP32 microcontroller that turns your device into an MQTT dashboard, and one of the devices that it supports is the M5Stack Core. [1]
Flashing Homepoint
Just download the latest release of Homepoint, unpack the ZIP file, connect your M5Stack Core to your PC using a USB-C cable and flash the firmware with esptool:
Once you have flashed the device, it starts a wireless access point, so you can visit its web interface and configure the Wi-Fi settings so it connects to your own network. After this, you just put a JSON file with the configuration of your dashboard on its internal storage, and this can be done using a web interface. So no need to reflash it every time you want to change its configuration. It also supports OTA (over-the-air) updates.
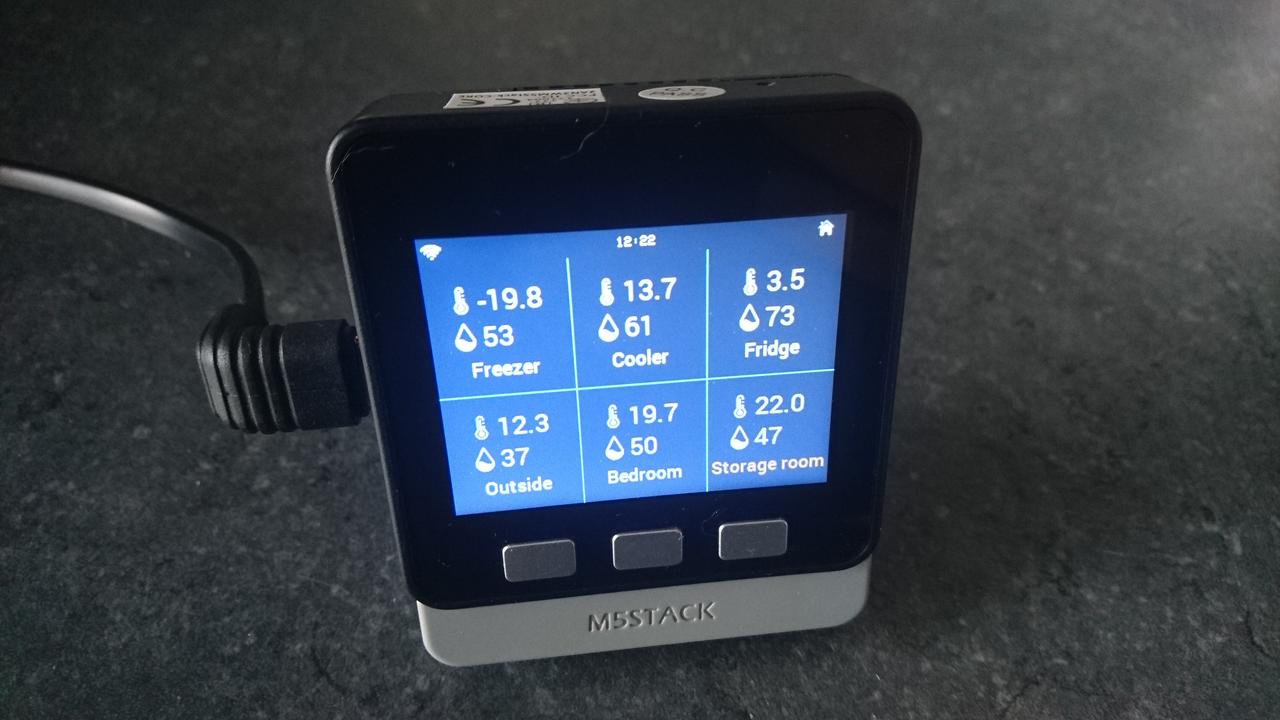
You can add sensors, but also switches and lights that you control with the buttons of the M5Stack Core. All in all, it's just what I needed. I now have my M5Stack Core on a shelf in my living room, showing the temperature and humidity outside, of the bedroom and storage room, of the freezer, cooler and fridge:
Configuration
The above configuration looks like this:
homepoint/config.json (Source)
{
  "wifi": "SSID",
  "password": "PASSWORD",
  "login": "admin",
  "webpass": "WEBPASSWORD",
  "mqttbroker": "mqtt://192.168.0.125",
  "mqttusername": "MQTTUSER",
  "mqttpasswd": "MQTTPASSWORD",
  "timezone": "CET-1CEST-2,M3.5.0/02:00:00,M10.5.0/03:00:00",
  "scenes": [{
    "name": "Freezer",
    "type": "Sensor",
    "devices": [{
      "name": "Temperature",
      "type": "singleValue",
      "jsondata": false,
      "firstIcon": "temperature_small",
      "getTopic": "rtl433/Oregon-THGR122N/1/218/temperature_C"
    },
    {
      "name": "Humidity",
      "type": "singleValue",
      "jsondata": false,
      "firstIcon":"humidity_small",
      "getTopic": "rtl433/Oregon-THGR122N/1/218/humidity"
    }]
  },
  {
    "name": "Cooler",
    "type": "Sensor",
    "devices": [{
      "name": "Temperature",
      "type": "singleValue",
      "jsondata": false,
      "firstIcon": "temperature_small",
      "getTopic": "rtl433/Prologue-TH/2/151/temperature_C"
    },
    {
      "name": "Humidity",
      "type": "singleValue",
      "jsondata": false,
      "firstIcon":"humidity_small",
      "getTopic": "rtl433/Prologue-TH/2/151/humidity"
    }]
  },
  {
    "name": "Fridge",
    "type": "Sensor",
    "devices": [{
      "name": "Temperature",
      "type": "singleValue",
      "jsondata": false,
      "firstIcon": "temperature_small",
      "getTopic": "rtl433/Oregon-THGR122N/1/175/temperature_C"
    },
    {
      "name": "Humidity",
      "type": "singleValue",
      "jsondata": false,
      "firstIcon":"humidity_small",
      "getTopic": "rtl433/Oregon-THGR122N/1/175/humidity"
    }]
  },
  {
    "name": "Outside",
    "type": "Sensor",
    "devices": [{
      "name": "Temperature",
      "type": "singleValue",
      "jsondata": false,
      "firstIcon": "temperature_small",
      "getTopic": "rtl433/Oregon-THGR122N/1/106/temperature_C"
    },
    {
      "name": "Humidity",
      "type": "singleValue",
      "jsondata": false,
      "firstIcon":"humidity_small",
      "getTopic": "rtl433/Oregon-THGR122N/1/106/humidity"
    }]
  },
  {
    "name": "Bedroom",
    "type": "Sensor",
    "devices": [{
      "name": "Temperature",
      "type": "singleValue",
      "jsondata": false,
      "firstIcon": "temperature_small",
      "getTopic": "rtl433/Prologue-TH/1/159/temperature_C"
    },
    {
      "name": "Humidity",
      "type": "singleValue",
      "jsondata": false,
      "firstIcon":"humidity_small",
      "getTopic": "rtl433/Prologue-TH/1/159/humidity"
    }]
  },
  {
    "name": "Storage room",
    "type": "Sensor",
    "devices": [{
      "name": "Temperature",
      "type": "singleValue",
      "jsondata": false,
      "firstIcon": "temperature_small",
      "getTopic": "rtl433/Prologue-TH/3/128/temperature_C"
    },
    {
      "name": "Humidity",
      "type": "singleValue",
      "jsondata": false,
      "firstIcon":"humidity_small",
      "getTopic": "rtl433/Prologue-TH/3/128/humidity"
    }]
  },
  {
    "name": "Raspberry Pi",
    "type": "Sensor",
    "devices": [{
      "name": "Temperature",
      "type": "combinedValues",
      "jsondata": true,
      "firstIcon": "temperature_small",
      "secondIcon": "wattage_small",
      "firstKey": "temperature",
      "secondKey": "disk_use",
      "getTopic": "system-sensors/sensor/pi-red/state"
    }]
  },
  {
    "name": "Bathroom",
    "type": "Light",
    "icon": "door",
    "devices": [{
      "name": "Bathroom light",
      "setTopic": "zwave/Bathroom/Bathroom_light/38/1/0/set",
      "getTopic": "zwave/Bathroom/Bathroom_light/38/1/0",
      "onValue": "99",
      "offValue": "0"
    }]
  }]
}
The first six sensors are all wireless temperature/humidity sensors that transmit their data on the 433.92 MHz frequency band. I use an RTL-SDR stick connected to a Raspberry Pi to receive their transmissions, together with the rtl_433toMQTT project that translates these transmissions to MQTT messages. This uses the rtl_433 project that has more than 150 protocol decoders for various devices.
I have also added an example of another MQTT sensor that shows the temperature and disk usage of one of my Raspberry Pis, collected by the system_sensors project. The last component in the configuration file above is an example of a light switch: it enables me to switch my bathroom light on and off (using ZWave2Mqtt). The setTopic is the MQTT topic to set the value of the light and the getTopic is the MQTT topic to get the value of the light. The values for the on and off states are defined in onValue and ofValue, respectively.
The picture above only shows the six sensors, but with the buttons of the M5Stack Core you can walk through each component until it shows a second screen with the two other components. You can even group components, for instance a group with all devices in a specific room. [2]
The perfect MQTT dashboard
All in all I'm quite happy with Homepoint. When I want to see the temperature of one of the sensors defined in the dashboard, I just have to push on one of the buttons to wake up the screen and I can immediately see all sensors. If you're using an MQTT-based home automation system, an M5Stack Core with Homepoint is the perfect companion.