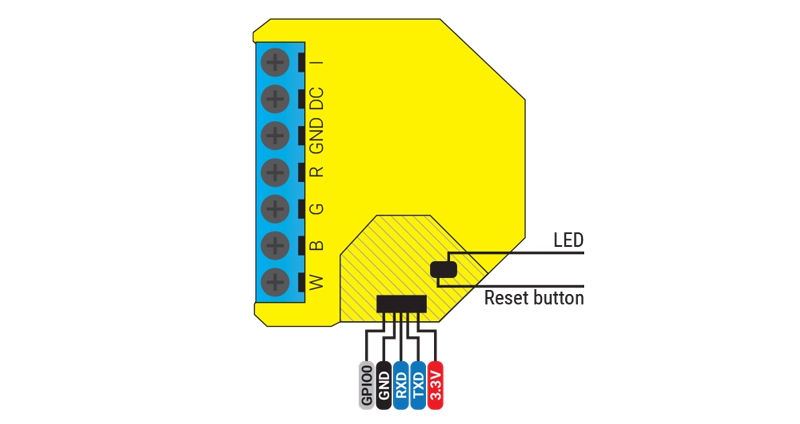
Using the M5Core2 for ESP32 development

A Wi-Fi enabled microcontroller such as the ESP32 or ESP8266 has a lot of applications, but if you use a development board, the result doesn't really look appealing in your living room, unless you spend some effort in creating your own case.

Enter M5Stack, a young Chinese company that offers a lot of ESP32-based products that don't look like development boards but like finished products. I first encountered them two years ago when I discovered their M5Stack Core BASIC Kit: a modular, stackable, ESP32 board with a 2 inch LCD screen, all in a package that doesn't look bad in your living room. I bought one and turned it into a dashboard for my MQTT-based home automation system: it could read the temperature and humidity of various sensors in my home by subscribing to the corresponding MQTT messages and showing them on the screen.

M5Core2, the newest ESP32 product of M5Stack

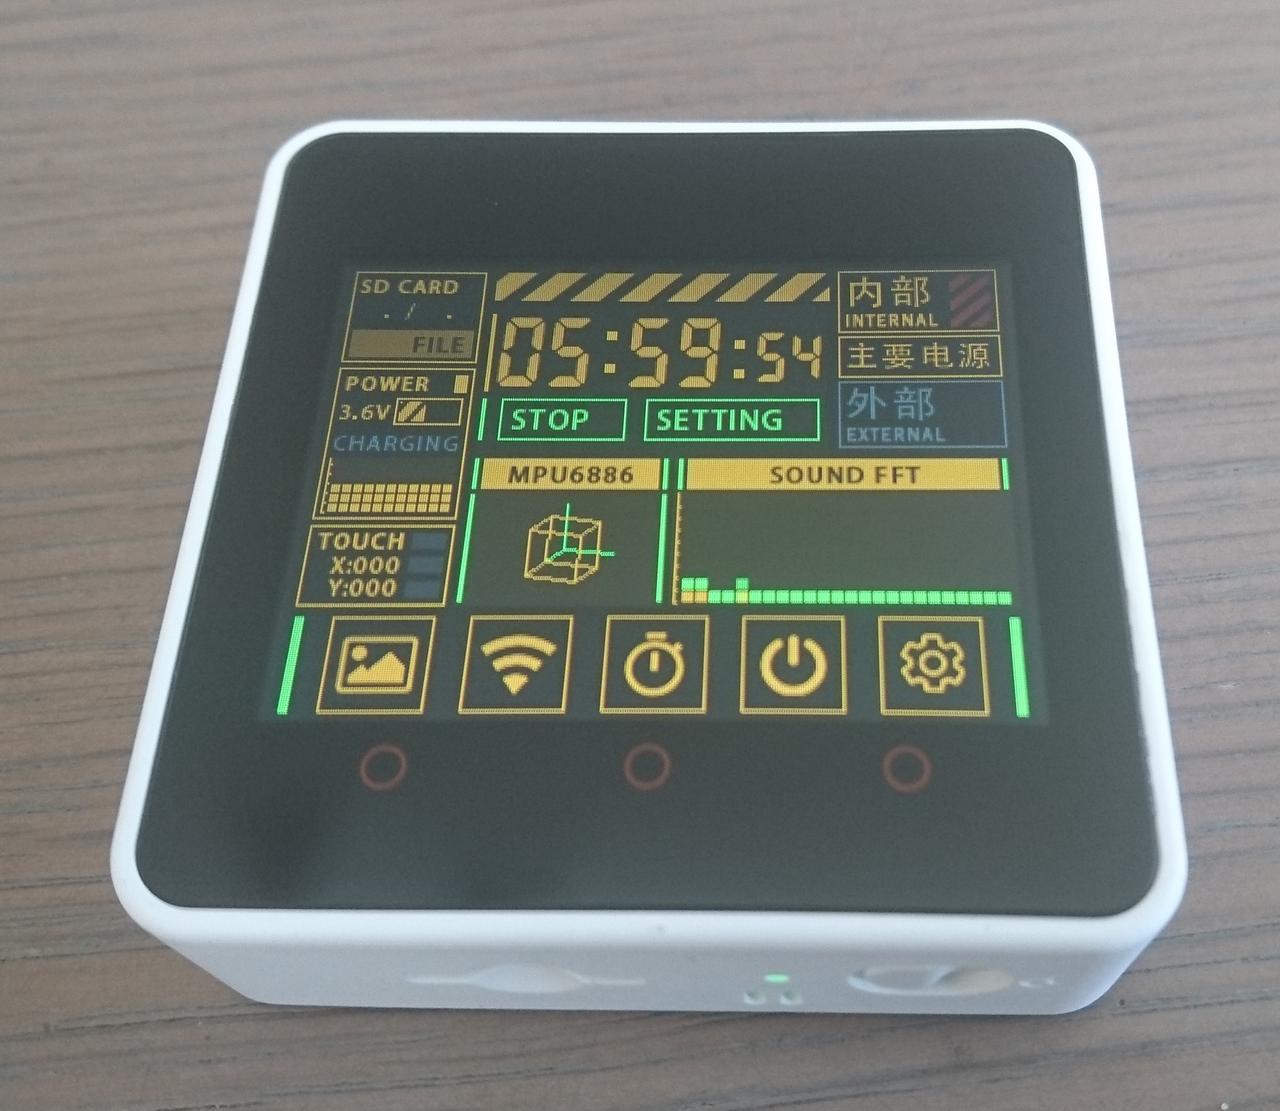
Now M5Stack has sent me their newest product: the M5Core2. It has more RAM, a touch screen, a real-time clock and even a microphone. This looks like an even better dashboard for my home automation system, adding a lot of possibilities.

Although from time to time you still bump into Chinese data sheets or code comments, I noticed that M5Stack's documentation and code has improved considerably since I last checked it for the first generation of this product. For the new M5Core2 there's:

I'm definitely going to experiment with this device and see how I can integrate this in my home automation system. I can reuse a lot of existing Arduino libraries, and together with the M5Core2 Arduino library it should be fairly straightforward to come up with a prototype.

Some specifications:

ESP32-D0WD-V3

240 MHz dual core, 600 DMIPS, 520 KB SRAM, Wi-Fi, dual mode Bluetooth

Flash

16 MB

PSRAM

8 MB

Input Voltage

5 V @ 500 mA

Interface

TypeC x 1, GROVE (I²C + I/O + UART) x 1

IPS LCD Screen

2.0"@320*240 ILI9342C

Touch Screen

FT6336U

Speaker

1W-0928

LED

Green power indicator light

Button

Power button, RST button, Virtual screen button x 3

Vibration reminder

Vibration motor

MIC

SPM1423

I2S Power Amplifier

NS4168

6-axis IMU

MPU6886

RTC

BM8563

PMU

AXP192

USB Chip

CP2104

DC-DC Boost

SY7088

TF card slot

16 GB max

Lithium Battery

390m Ah @ 3.7 V

Antenna

2.4 GHz 3D antenna

Operating temperature

0°C to 40°C

Net Weight

52 g

Gross Weight

70 g

Product Size

54 mm x 54 mm x 16 mm

Package Size

75 mm x 60 mm x 20 mm

Case Material

Plastic

How to test a Python program with command-line arguments in pytest

Recently I wanted to test how a Python program behaved with various combinations of command-line arguments.

Thanks to pytest's mocker fixture, this is easy to do:

def test_arguments_from_cli(mocker):
    """Test whether arguments from the command line are set up correctly in a HermesApp object."""
    mocker.patch(
        "sys.argv",
        [
            "rhasspy-hermes-app-test",
            "--host",
            "rhasspy.home",
            "--port",
            "8883",
            "--tls",
            "--username",
            "rhasspy-hermes-app",
            "--password",
            "test",
        ],
    )
    app = HermesApp("Test arguments in init", mqtt_client=mocker.MagicMock())

    assert app.args.host == "rhasspy.home"
    assert app.args.port == 8883
    assert app.args.tls is True
    assert app.args.username == "rhasspy-hermes-app"
    assert app.args.password == "test"

You just patch the sys.argv variable with the command-line arguments you want to test your program with. This variable is a list of strings representing the arguments as separated by a space, and with the command's name as the first element. So this example function patches sys.argv to behave as if the test function is running in a command you started as follows:

$ rhasspy-hermes-app-test --host rhasspy.home --port 8883 --tls --username rhasspy-hermes-app --password test

In this case the HermesApp object uses the argparse library to populate some attributes with values from sys.argv, such as host, port, tls, username and password. The function test_arguments_from_cli tests whether these attributes are initialized correctly. But you can use the same approach if you have a main function for your command that reads your command-line arguments.

If you want to test other combinations of command-line arguments, you just add another test function that patches sys.argv with another list of arguments. All these test functions are executed independently with their own patched argument list.

Automatically save the volume of your ReSpeaker 2-Mics Pi HAT

For my Rhasspy voice assistant I use the Seeed ReSpeaker 2-Mics Pi HAT on a Raspberry Pi: it's cheap and has two on-board microphones, so you only need to a add a speaker to use it for voice projects.

The drivers are open source and they can be installed easily from the respeaker/seeed-voicecard repository together with supporting systemd services. However, every time you reboot your Raspberry Pi, the playback volume is set to its maximal value, so the feedback sounds and replies from your voice assistant echo through the whole house.

I never bothered to change this behaviour, but when someone on the Rhasspy forum asked about it yesterday (Rhasspy with respeaker 2 hat starts with highest playback volume) I decided to dive into the details.

It turns out that the seeed-voicecard.service systemd script removes your system's asound.conf and asound.state at each boot, replacing them by its default files.

If you know this and read the /usr/bin/seeed-voicecard shell script, the solution for the state file (containing your volume settings) is simple: let the ALSA service store to and restore from this file installed by the Seeed driver, /etc/voicecard/wm8960_asound.state. Have a look at the alsa-restore.service file:

$ systemctl cat alsa-restore.service
# /lib/systemd/system/alsa-restore.service
#
# Note that two different ALSA card state management schemes exist and they
# can be switched using a file exist check - /etc/alsa/state-daemon.conf .
#

[Unit]
Description=Save/Restore Sound Card State
Documentation=man:alsactl(1)
ConditionPathExists=!/etc/alsa/state-daemon.conf
ConditionPathExistsGlob=/dev/snd/control*
After=alsa-state.service

[Service]
Type=oneshot
RemainAfterExit=true
ExecStart=-/usr/sbin/alsactl -E HOME=/run/alsa restore
ExecStop=-/usr/sbin/alsactl -E HOME=/run/alsa store

You need to change the latter two lines. So edit the service file to override these lines:

$ sudo systemctl edit alsa-restore.service

Then add the following lines containing the filename of the Seeed driver's asound state file:

[Service]
ExecStart=
ExecStart=-/usr/sbin/alsactl -E HOME=/run/alsa -f /etc/voicecard/wm8960_asound.state restore
ExecStop=
ExecStop=-/usr/sbin/alsactl -E HOME=/run/alsa -f /etc/voicecard/wm8960_asound.state store

The empty ExecStart and ExecStop commands are needed because you want to replace the original commands instead of adding extra commands.

Reload the systemd configuration after your changes:

$ sudo systemctl daemon-reload

Then reboot. After this, every change you make to the ALSA mixer (for instance with the alsamixer command) will be saved when your Raspberry Pi shuts down and reloaded when it boots, so it always uses the volume you have set.

Flashing a Shelly RGBW2 with crocodile clips and cut resistor leads

The Shelly RGBW2 is a nice Wi-Fi RGBW LED controller. [1] But I want to have open source firmware on as much devices as possible at home. So after playing with the original firmware for a while (for my book about self-hosted home automation) I decided to flash ESPHome on the device.

ESPHome doesn't list the Shelly RGBW2 as an officially supported device, but as it's built around an ESP8266, it should run the firmware fine. It's just a matter of finding the right firmware configuration and the right pins to connect the USB to TTL adapter cable to flash the firmware.

Finding the device pinout isn't an issue. Shelly has extensive documentation about the RGBW2 and neatly shows the pins under the header Flash/Debug:

/images/shelly-rgbw2-pins.png

However, connecting to the pin header is something else. While the Shelly 1 has a standard-size 2.54 mm pitch header that fits normal (Dupont) jumper wires, the RGBW2 (as well as the Shelly 2.5) has a 1.27 mm pitch header, which is considerably smaller. So you need some kind of adapter. [2]

I found a number of solutions for this:

The latter looks like the nicest solution, but I had to order the 1.27 mm pitch header and I wanted to flash the device now, so I thought about the easiest way to create an adapter with the stuff I had lying at home.

After giving it some thought, I MacGyvered the following solution:

/images/shelly-rgbw2-crocodile.jpg

Yes, that's right, these are four crocodile clips and some thin wires put into the header.

The wires are leads I cut off two resistors. This gives you four wires, but you need to connect five pins. However, while flashing you have to pull GPIO0 to ground to start the boot loader in flash mode, so you can just fold one of the resistor leads and put one end in the GPIO0 hole and the other one in the GND hole. The folded wire is then connected to the white crocodile clip you see at the top.

The crocodile clips then connect to jumper wires that go into the breadboard, where the USB to TTL adapter is plugged in, and then connected to my computer to flash the device with the firmware.

This works, but you have to make sure that the resistor leads fit right into the header holes. After some wiggling, the esphome flasher recognized the serial connection, and the result was ESPHome on my RGBW2, which integrates nicely with Home Assistant.

And after this, you can apply OTA (over-the-air) updates of the ESPHome firmware, so you don't need the MacGyver adapter anymore.

Create a table without a header in reStructuredText and Markdown

Have you ever written a table without a header in Markdown? It turns out that most Markdown parsers don't support tables without headers.

When I wrote the page about my book Control Your Home with Raspberry Pi on this website, I wanted to list some specifications (title, publication date, number of pages, ...) in a table without a header. In reStructuredText, which I'm using for this website, the code for the table looks like this:

+----------------------+-------------------------------------+
| **Title**            | Control Your Home with Raspberry Pi |
+----------------------+-------------------------------------+
| **Author**           | Koen Vervloesem                     |
+----------------------+-------------------------------------+
| **Publication date** | 2020-08-17                          |
+----------------------+-------------------------------------+
| **Number of pages**  | 331                                 |
+----------------------+-------------------------------------+
| **Price**            | € 37.50                             |
+----------------------+-------------------------------------+
| **ISBN-13**          | 978-1-907920-94-3                   |
+----------------------+-------------------------------------+
| **ISBN-10**          | 1-907920-94-3                       |
+----------------------+-------------------------------------+
| **Publisher**        | Elektor International Media (EIM)   |
+----------------------+-------------------------------------+

This is rendered by Nikola, the static site generator I'm using, as:

Title

Control Your Home with Raspberry Pi

Author

Koen Vervloesem

Publication date

2020-08-17

Number of pages

331

Price

€ 37.50

ISBN-13

978-1-907920-94-3

ISBN-10

1-907920-94-3

Publisher

Elektor International Media (EIM)

This looks fine as a simple table without a header.

Now I wanted to do the same in Markdown in the corresponding GitHub repository with code examples. I could have written the README as a reStructuredText file, but I already created a README.md out of habit, so I tried to create the same table without header in Markdown. But apparently GitHub-flavoured Markdown and many other Markdown flavours don't support tables without headers.

That StackOverflow post linked above shows a hack that seems to work in many Markdown parsers, including in GitHub:

|    <!-- -->          |        <!-- -->                     |
|----------------------|-------------------------------------|
| **Title**            | Control Your Home with Raspberry Pi |
| **Author**           | Koen Vervloesem                     |
| **Publication date** | 2020-08-17                          |
| **Number of pages**  | 331                                 |
| **Price**            | € 37.50                             |
| **ISBN-13**          | 978-1-907920-94-3                   |
| **ISBN-10**          | 1-907920-94-3                       |
| **Publisher**        | Elektor International Media (EIM)   |

This adds HTML comment blocks in the header cells, which essentially adds an empty header row to the table. Unfortunately in GitHub the result looks a bit odd, with that compressed empty header row:

/images/markdown-table-without-header.png

This is literally an ugly hack. Of course I can just create an HTML table without a header in the Markdown file, as shown in one of the StackOverflow answers, but that defeats the purpose of using a more human-centered markup language. So now I have converted the README file from Markdown to reStructuredText. The result is rendered by GitHub as:

/images/rst-table-without-header.png

Just like I wanted. It's these small quibbles with Markdown all the time that strenghten my preference for reStructuredText as a markup language.

Heavy reading

/images/heavy_reading.jpg

I knew I had some heavy reading on my bookshelf, but I was just surprised by this view in my home office. Coincidentally, it was one of the mathematics shelves. [1]

Automating society

Earlier this year, I wrote two articles for AlgorithmWatch:

Both articles were part of AlgorithmWatch's upcoming report Automating Society 2020, which investigates the applications of automated decision-making in the public sector in various European countries.

The full report will be published this fall, but the abridged versions of both stories that will come in the report have now been published on the website Ethics of Algorithms of the Bertelsmann Stiftung:

Especially the Dutch story about SyRI, an algorithm cross-referencing personal data from citizens in various databases, makes it clear that algorithmic fraud detection has a lot of pitfalls: the way it was used in the Netherlands there was no transparency (the exact algorithm or risk model was never disclosed), it exacerbated biases and discrimination, and it was used for purposes it wasn't designed for.

The best argument against such systems is actually quite simple: you don't need them. As Ronald Huissen from the Platform Bescherming Burgerrechten said, the government doesn't need this kind of mass surveillance to prevent fraud:

The government already has information about who owns which house, so it could check this before granting the person a rental allowance. For all big fraud scandals in social security we have seen in the past decades it became clear afterwards that they could have been prevented with simple checks beforehand. That happens far too little. It is tempting to look for solutions in secret algorithms analyzing big data sets, but often the solution is far simpler.

It's an issue I see all too often: there's a problem (social fraud, fiscal fraud, crime, a virus outbreak, ...) and the government thinks it has to solve this with a big centralized database, massive surveillance and some technological voodoo (big data, AI, an app, or the next big thing). The solution is often much simpler: everyone just has to do their job instead of outsourcing it to technology.

Installing packages in Ubuntu's live environment

Recently I wanted to boot Ubuntu's live CD and install the OpenSSH server in this live environment so I could access it from another computer.

This is no problem, but I'm using a Belgian keyboard layout. Although I have learned writing qwerty on an azerty keyboard, I thought it would be easier to change the keyboard layout.

I never remember the right syntax for setxkbmap, so I just started the graphical installer and went through the first steps until I had changed the keyboard layout.

Then I opened a terminal, set a password for the ubuntu user and installed the OpenSSH server:

ubuntu@ubuntu:~$ passwd
ubuntu@ubuntu:~$ sudo apt update
ubuntu@ubuntu:~$ sudo apt install --yes openssh-server

Uh-oh, the installation finished with an error. I investigated with sudo journalctl -xe:

Jul 13 08:48:51 ubuntu sshd[9072]: /etc/ssh/sshd_config: No such file or directory
Jul 13 08:48:51 ubuntu systemd[1]: ssh.service: Control process exited, code=exited, status=1/FAILURE

I was puzzled: why would this basic configuration file not be created? OK, I thought, let's just create the file and restart the OpenSSH server:

ubuntu@ubuntu:~$ sudo touch /etc/ssh/sshd_config
ubuntu@ubuntu:~$ sudo systemctl restart sshd

But then the logs showed another error:

Jul 13 08:51:45 ubuntu sshd[9144]: Privilege separation user sshd does not exist
Jul 13 08:51:45 ubuntu systemd[1]: ssh.service: Control process exited, code=exited, status=255/EXCEPTION

Wait a minute, this really can't be right. If the sshd user isn't even created, I did something seriously wrong. So I took a step back and looked at the original error message, which I brushed off earlier. I now saw it complained with "Could not open lock file /var/lib/apt/lists/lock". And then I remembered: oh, I left the installer window open! I closed the window and then ran:

ubuntu@ubuntu:~$ sudo apt --fix-broken install

This fixed the installation of OpenSSH server, after which I could access the live environment from another computer.

Fixing a failed upgrade to Ubuntu 20.04 LTS in recovery mode

My main laptop has been running Ubuntu 19.10 (Eoan Ermine). I deliberately postponed the upgrade to Ubuntu 20.04 LTS (Focal Fossa) because I had a very busy period writing a book and studying for evening classes. I just couldn't afford the time to fix potential upgrade issues, my laptop should "just work".

But now time is running out: Ubuntu 19.10 will reach end of life status on July 17th, 2020. Because I'm having a 'vacation' week now, I could spend some time if the upgrade fails.

And failing it did...

I'm not sure what went wrong, but after all packages had been downloaded and when the upgrade process was in the middle of applying the package upgrades, the screen became grey and showed the message "Something has gone wrong. Please logout and try again." I had to restart Ubuntu and it even didn't reach the login screen.

I first tried removing quiet splash from the boot entry, but that didn't make me any wiser. So off to recovery mode then:

  • Hold the Shift key while booting the PC.

  • In the GRUB boot menu that appears, choose the advanced options and then recovery mode.

  • In the recovery menu that appears, enable networking first and then choose the option to open a root shell.

Because the installation has been aborted, I tried fixing a broken install:

# apt --fix-broken install

To my surprise this "just worked", so it seems the system wasn't broken that badly.

To be sure I didn't miss any package configuration, I configured all unpacked but not yet configured packages:

# dpkg --configure -a

This returned silently, so no issues there.

Then I continued the upgrade:

# apt upgrade

This all went smoothly. So after the upgrade succeeded, I had Ubuntu 20.04 on my system:

# lsb_release -a
No LSB modules are available.
Distributor ID:   Ubuntu
Description:  Ubuntu 20.04 LTS
Release:  20.04
Codename: focal

I rebooted:

# reboot

And then I could login again and was welcomed by this stylish desktop background:

/images/ubuntu-20.04-desktop-with-lsb-release.png

New blog

I'm no stranger to blogging. There was a time when I wrote almost daily on two blogs (in Dutch): on "De conceptuele ingenieur" (no longer online) I wrote about philosophy and science, and on "QED" (archived at vervloesem.eu/qed) I wrote about mathematics and computers. But more than ten years ago I stopped blogging, because I lacked the time.

For a couple of years I have been thinking I should start over. Now's the time. But this time not with a specific theme or a split personality. On this blog I will write about everything that interests me.

That's it for now. You'll see what comes next.