Building wireless sensor networks with OpenThread, CoAP, and Zephyr
Last week my new book has been published, Building Wireless Sensor Networks with OpenThread: Developing CoAP Applications for Thread Networks with Zephyr.
Thread is a protocol for building efficient, secure and scalable wireless mesh networks for the Internet of Things (IoT), based on IPv6. OpenThread is an open-source implementation of the Thread protocol, originally developed by Google. It offers a comprehensive Application Programming Interface (API) that is both operating system and platform agnostic. OpenThread is the industry’s reference implementation and the go-to platform for professional Thread application developers.
This book uses OpenThread in conjunction with Zephyr, an open-source real-time operating system designed for use with resource-constrained devices. This allows you to develop Thread applications that work on various hardware platforms, without the need to delve into low-level details or to learn another API when switching hardware platforms.
With its practical approach, this book not only explains theoretical concepts, but also demonstrates Thread’s network features with the use of practical examples. It explains the code used for a variety of basic Thread applications based on Constrained Application Protocol (CoAP). This includes advanced topics such as service discovery and security. As you work through this book, you’ll build on both your knowledge and skills. By the time you finish the final chapter, you’ll have the confidence to effectively implement Thread-based wireless networks for your own IoT projects.
What is Thread?
Thread is a low-power, wireless, and IPv6-based networking protocol designed specifically for IoT devices. Development of the protocol is managed by the Thread Group, an alliance founded in 2015. This is a consortium of major industry players, including Google, Apple, Amazon, Qualcomm, Silicon Labs, and Nordic Semiconductor.
You can download the Thread specification for free, although registration is required. The version history is as follows:
Version |
Release year |
Remarks |
|---|---|---|
Thread 1.0 |
2015 |
Never implemented in commercial products |
Thread 1.1 |
2017 |
|
Thread 1.2 |
2019 |
|
Thread 1.3 |
2023 |
|
All versions of the Thread specification maintain backward compatibility.
Thread’s architecture
Thread employs a mesh networking architecture that allows devices to communicate directly with each other, eliminating the need for a central hub or gateway. This architecture offers inherent redundancy, as devices can relay data using multiple paths, ensuring increased reliability in case of any single node failure.
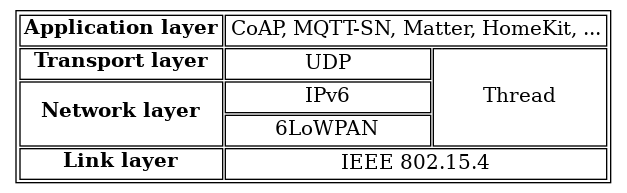
The Thread protocol stack is built upon the widely used IPv6 protocol, which simplifies the integration of Thread networks into existing IP infrastructures. Thread is designed to be lightweight, streamlined and efficient, making it an excellent protocol for IoT devices running in resource-constrained environments.
Before discussing Thread, it’s essential to understand its place in the network protocol environment. Most modern networks are based on the Internet Protocol suite, which uses a four-layer architecture. The layers of the Internet Protocol suite are, from bottom to top:
- Link layer
-
Defines the device’s connection with a local network. Protocols like Ethernet and Wi-Fi operate within this layer. In the more complex Open Systems Interconnection (OSI) model, this layer includes the physical and data link layers.
- Network layer
-
Enables communication across network boundaries, known as routing. The Internet Protocol (IP) operates within this layer and defines IP addresses.
- Transport layer
-
Enables communication between two devices, either on the same network or on different networks with routers in between. The transport layer also defines the concept of a port. User Datagram Protocol (UDP) and Transmission Control Protocol (TCP) operate within this layer.
- Application layer
-
Facilitates communication between applications on the same device or different devices. Protocols like HyperText Transfer Protocol (HTTP), Domain Name System (DNS), Simple Mail Transfer Protocol (SMTP), and Message Queuing Telemetry Transport (MQTT) operate within this layer.
When data is transmitted across the network, the data of each layer is embedded in the layer below it, as shown in this diagram:
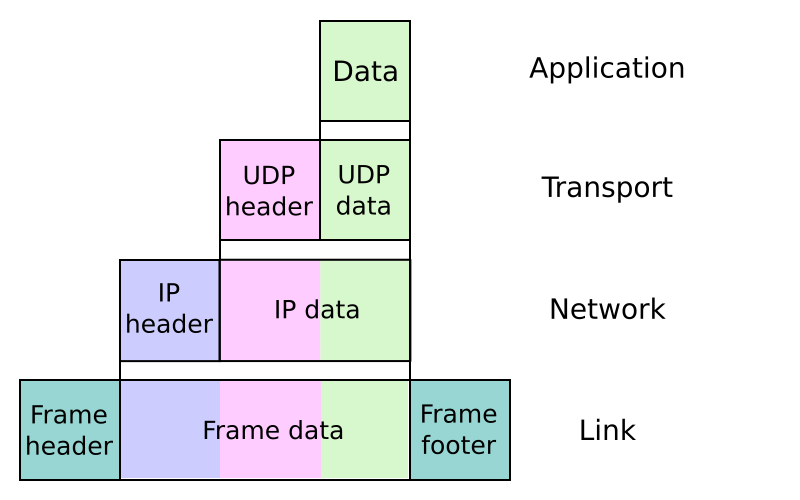
Network data is encapsulated in the four layers of the Internet Protocol suite (based on: Colin Burnett, CC BY-SA 3.0)
Thread operates in the network and transport layers. However, it’s important to know what’s going on in all layers.
Link layer: IEEE 802.15.4
For its link layer, Thread builds upon the IEEE 802.15.4 standard, a specification by the Institute of Electrical and Electronics Engineers (IEEE). This is the same link layer that Zigbee uses. It focuses on low power consumption, allowing devices to communicate for months or even years on a single battery charge. The direct communication range is approximately 10 meters under normal conditions.
IEEE 802.15.4 is a radio standard operating in the license-free 2.4 GHz frequency band with data rates up to 250 kbit/s. It has 16 channels (channels 11 to 26), ranging from 2405 to 2530 MHz with 5 MHz channel spacing. This is the same 2.4 GHz frequency band used by Bluetooth and Wi-Fi.
An IEEE 802.15.4 network includes two types of devices:
- Full Function Device (FFD)
-
A device that implements the complete feature set of the IEEE 802.15.4 standard. It can communicate with all other IEEE 802.15.4 devices within its immediate radio range.
- Reduced Function Device (RFD)
-
A device that implements only a subset of features of the IEEE 802.15.4 standard to conserve device resources. It can only communicate with the FFD through which it joined the network.
An IEEE 802.15.4 network is known as a Personal Area Network (PAN). Each PAN is identified by a unique PAN ID that no other PAN in range is allowed to have. Within each PAN, one FFD is the PAN coordinator. This device initiates and manages the PAN, enabling other devices to join the network.
IEEE 802.15.4 includes built-in encryption and authentication, using AES-128 (128-bit Advanced Encryption Standard) in CCM* mode, a variation of CCM mode (counter with cipher block chaining message authentication code). This mode provides authenticated encryption by combining encryption in CTR (counter) mode with authentication using CBC-MAC (cipher block chaining message authentication code). The original message is transmitted alongside a MIC (Message Integrity Check) so the recipient can validate that the message has not been tampered with.
Devices can only communicate with each other in an IEEE 802.15.4 network if they use the same 128-bit AES key. The IEEE 802.15.4 standard doesn’t, however, define the key exchange process. The key must therefore either be stored in each device during manufacture, entered manually by the user, or by a key exchange protocol in the layers above the link layer.
IEEE 802.15.4 data packets can transmit data from 0 to 127 bytes long. Each IEEE 802.15.4 device has an EUI-64 (Extended Unique Identifier) address set by the manufacturer, which is used as a MAC address. When a device joins a PAN, it’s also assigned a 16-bit short address. This allows the transmitted packets to be shorter because they only need to use two instead of eight bytes to define source and target addresses. Some special short addresses exist, such as 0xffff as a broadcast address to send packets to all devices, and 0xfffe as an unassigned address, used by devices while joining a network.
Network layer: 6LoWPAN and IPv6
Thread’s network layer consists of IPv6 over Low-Power Wireless Access Networks (6LoWPAN). This is an IETF specification described in RFC 4944, "Transmission of IPv6 Packets over IEEE 802.15.4 Networks", with an update for the compression mechanism in RFC 6282, "Compression Format for IPv6 Datagrams over IEEE 802.15.4-Based Networks". 6LoWPAN’s purpose is to allow even the smallest devices with limited processing power and low energy requirements to be part of the Internet of Things.
6LoWPAN essentially enables you to run an IPv6 network over the IEEE 802.15.4 link layer. It acts as an ‘adaptation layer’ between IPv6 and IEEE 802.15.4 and is therefore sometimes considered part of the link layer. This adaptation poses some challenges. For example, IPv6 mandates that all links can handle datagram sizes of at least 1280 bytes, but IEEE 802.15.4, as explained in the previous subsection, limits a frame to 127 bytes. 6LoWPAN solves this by excluding information in the 6LoWPAN header that can already be derived from IEEE 802.15.4 frames and by using local, shortened addresses. If the payload is still too large, it’s divided into fragments.
The link-local IPv6 addresses of 6LoWPAN devices are derived from the IEEE 802.15.4 EUI-64 addresses and their shortened 16-bit addresses. The devices in a 6LoWPAN network can communicate directly with ‘normal’ IPv6 devices in a network if connected via an edge router. This means there is no need for translation via a gateway, in contrast to non-IP networks such as Zigbee or Z-Wave. Communication with non-6LoWPAN networks purely involves forwarding data packets at the network layer.
In this layer, Thread builds upon IEEE 802.15.4 to create an IPv6-based mesh network. In IEEE 802.15.4 only communication between devices that are in immediate radio range is possible, whereas routing allows devices that aren’t in immediate range to communicate.
If you want to delve into more details of Thread’s network layer, consult the Thread Group’s white paper Thread Usage of 6LoWPAN.
Transport layer: UDP
On top of 6LoWPAN and IPv6, Thread’s transport layer employs the User Datagram Protocol (UDP), which is the lesser known alternative to Transmission Control Protocol (TCP).
UDP has the following properties:
- Connectionless
-
Unlike TCP, UDP doesn’t require establishing a connection before transferring data. It sends datagrams (packets) directly without any prior setup.
- No error checking and recovery
-
UDP doesn’t provide built-in error checking, nor does it ensure the delivery of packets. If data is lost or corrupted during transmission, UDP doesn’t attempt to recover or resend it.
- Speed
-
UDP is faster than TCP, as it doesn’t involve the overhead of establishing and maintaining a connection, error checking, or guaranteeing packet delivery.
UDP is ideal for use by Thread for several reasons:
- Resource constraints
-
Thread devices often have limited processing power, memory, and energy. The simplicity and low overhead of UDP make it a better fitting choice for such resource-constrained devices compared to TCP.
- Lower latency
-
UDP’s connectionless and lightweight nature guarantees data transmission with low latency, making it appropriate for wireless sensors.
Thread lacks an application layer
Unlike home automation protocols such as Zigbee, Z-Wave, or Matter, the Thread standard doesn’t define an application layer. A Thread network merely offers network infrastructure that applications can use to communicate. Just as your web browser and email client use TCP/IP over Ethernet or Wi-Fi, home automation devices can use Thread over IEEE 802.15.4 as their network infrastructure.
Several application layers exist that can make use of Thread:
- Constrained Application Protocol (CoAP)
-
A simpler version of HTTP, designed for resource-constrained devices and using UDP instead of TCP.
- MQTT for Sensor Networks (MQTT-SN)
-
A variant of MQTT designed to be used over UDP.
- Apple HomeKit
-
Apple’s application protocol for home automation devices.
- Matter
-
A new home automation standard developed by the Connectivity Standards Alliance (CSA).
Like your home network which simultaneously hosts a lot of application protocols including HTTP, DNS, and SMTP, a Thread network can also run all these application protocols concurrently.
The Thread network stack supports multiple application protocols simultaneously.
Throughout this book, I will be using CoAP as an application protocol in a Thread network. Once you have a Thread network set up, you can also use it for Apple HomeKit and Matter devices.
Advantages of Thread
Some of Thread’s key benefits include:
Scalability
Thread’s mesh network architecture allows for large-scale deployment of IoT devices, supporting hundreds of devices within a single network. Thread accommodates up to 32 Routers per network and up to 511 End Devices per Router. In addition, from Thread 1.2, multiple Thread networks can be integrated into one single Thread domain, allowing thousands of devices within a mesh network.
Security
Devices can’t access a Thread network without authorization. Moreover, all communication on a Thread network is encrypted using IEEE 802.15.4 security mechanisms. As a result, an outsider without access to the network credentials can’t read network traffic.
Reliability
Thread networks are robust and support self-healing and self-organizing network properties at various levels, ensuring the network’s resilience against failures. This all happens transparently to the user; messages are automatically routed around any bad node via alternative paths.
For example, an End Device requires a parent Router to communicate with the rest of the network. If communication with this parent Router fails for any reason and it becomes unavailable the End Device will choose another parent Router in its neighborhood, after which communication resumes.
Thread Routers also relay packets from their End Devices to other Routers using the most efficient route they can find. In case of connection problems, the Router will immediately seek an alternate route. Router-Eligible End Devices can also temporarily upgrade their status to Routers if necessary. Each Thread network has a Leader who supervises the Routers and whose role is dynamically selected by the Routers. If the Leader fails, another Router automatically takes over as Leader.
Border Routers have the same built-in resilience. In a Thread network with multiple Border Routers, communication between Thread devices and devices on another IP network (such as a home network) occurs along multiple routes. If one Border Router loses connectivity, communications will be rerouted via the other Border Routers. If your Thread network only has a single Border Router, this will become a single point of failure for communication with the outside network.
Low power consumption
Thread is based on the power-efficient IEEE 802.15.4 link layer. This enables devices to operate on batteries for prolonged periods. Sleepy End Devices will also switch off their radio during idle periods and only wake up periodically to communicate with their parent Router, thereby giving even longer battery life.
Interoperability
As the protocol is built upon IPv6, Thread devices are straightforward to incorporate into existing networks, both in industrial and home infrastructure, and for both local networks and cloud connections. You don’t need a proprietary gateway; every IP-based device is able to communicate with Thread devices, as long as there’s a route between both devices facilitated by a Border Router.
Disadvantages of Thread
In life, they say there’s no such thing as a free lunch and Thread is no exception to this rule. Some of its limitations are:
Limited range
Thread’s emphasis on low power consumption can lead to a restricted wireless range compared with other technologies such as Wi-Fi. Although this can be offset by its mesh architecture, where Routers relay messages, it still means that devices in general can’t be placed too far apart.
Low data rates
Thread supports lower data rates than some rival IoT technologies. This makes Thread unsuitable for applications requiring high throughput.
Complexity
The Thread protocol stack may be more challenging to implement compared to other IoT networking solutions, potentially ramping up development costs and time.
Platforms used in this book
In this book I focus on building wireless sensor networks using the Thread protocol together with the following hardware and software environments:
- Nordic Semiconductor’s nRF52840 SoC
-
A powerful yet energy-efficient and low cost hardware solution for Thread-based IoT devices
- OpenThread
-
An open-source implementation of the Thread protocol, originally developed by Google, making it easy to incorporate Thread into your IoT projects
- Zephyr
-
An open-source real-time operating system designed for resource-constrained devices
Armed with these tools and by using practical examples I will go on to guide you step-by-step through the details of the hardware and software required to build Thread networks and OpenThread-based applications.
Nordic Semiconductor’s nRF52840 SoC
Nordic Semiconductor’s nRF52840 is a SoC built around the 32-bit ARM Cortex-M4 CPU running at 64 MHz. This chip supports Bluetooth Low Energy (BLE), Bluetooth Mesh, Thread, Zigbee, IEEE 802.15.4, ANT and 2.4 GHz proprietary stacks. With its 1 MB flash storage and 256 KB RAM, it offers ample resources for advanced Thread applications.
This SoC is available for developers in the form of Nordic Semiconductor’s user-friendly nRF52840 Dongle. You can power and program this small, low-cost USB dongle via a computer USB port. The documentation lists comprehensive information about the dongle.
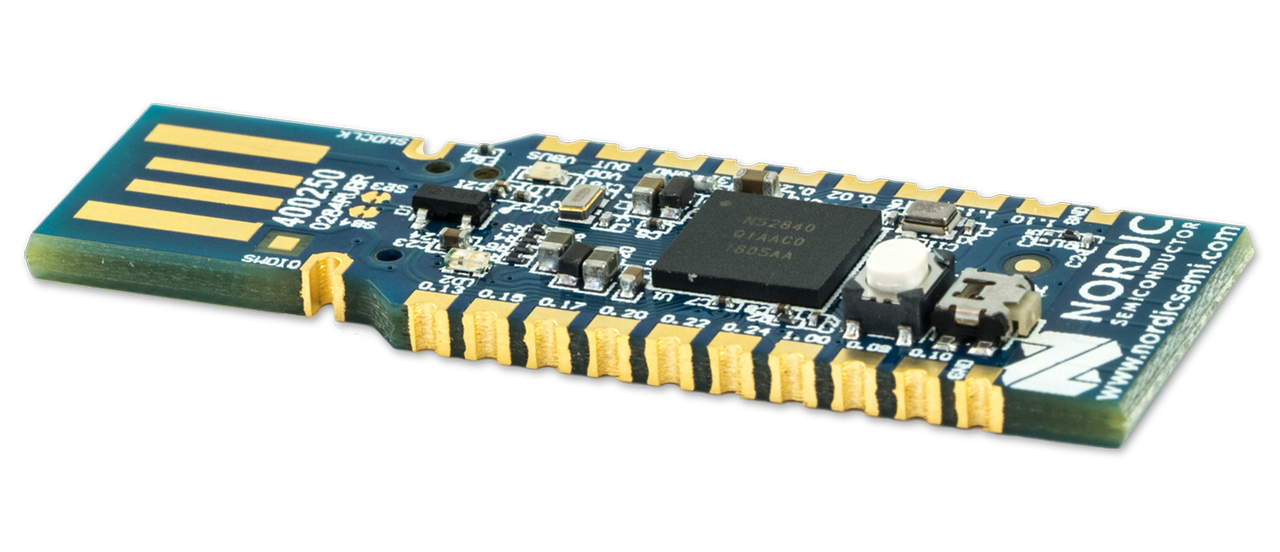
Nordic Semiconductor’s nRF52840 Dongle is a low-cost USB dongle ideal for experimenting with Thread. (image source: Nordic Semiconductor)
OpenThread
Thread is basically a networking protocol; in order to work with it you need an implementation of the Thread networking protocol. The industry’s reference implementation, used even by professional Thread device developers, is OpenThread. It’s a BSD-licensed implementation, with development ongoing via its GitHub repository. The license for this software allows for its use in both open-source and proprietary applications.
OpenThread provides an Application Programming Interface (API) that’s operating system and platform agnostic. It has a narrow platform abstraction layer to achieve this, and has a small memory footprint, making it highly portable. In this book, I will be using OpenThread in conjunction with Zephyr, but the same API can be used in other combinations, such as ESP-IDF for Espressif’s Thread SoCs.
The BSD-licensed OpenThread project is the industry’s standard implementation of the Thread protocol.
Zephyr
Zephyr is an open-source real-time operating system (RTOS) designed for resource-constrained devices. It incorporates OpenThread as a module, simplifying the process of creating Thread applications based on Zephyr and OpenThread. Because of Zephyr’s hardware abstraction layer, these applications will run on all SoCs supported by Zephyr that have an IEEE 802.15.4 radio facility.
Zephyr is an open-source real-time operating system (RTOS) with excellent support for OpenThread.
Recommended hardware
For the hardware, I recommend a Nordic Semiconductor nRF52840 Dongle, but you can use any microcontroller board with Thread radio supported by Zephyr. There are variants of the dongle by other manufacturers, such as the April USB Dongle 52840 (with an external antenna) or the nRF52840 MDK USB Dongle from makerdiary (with a case).
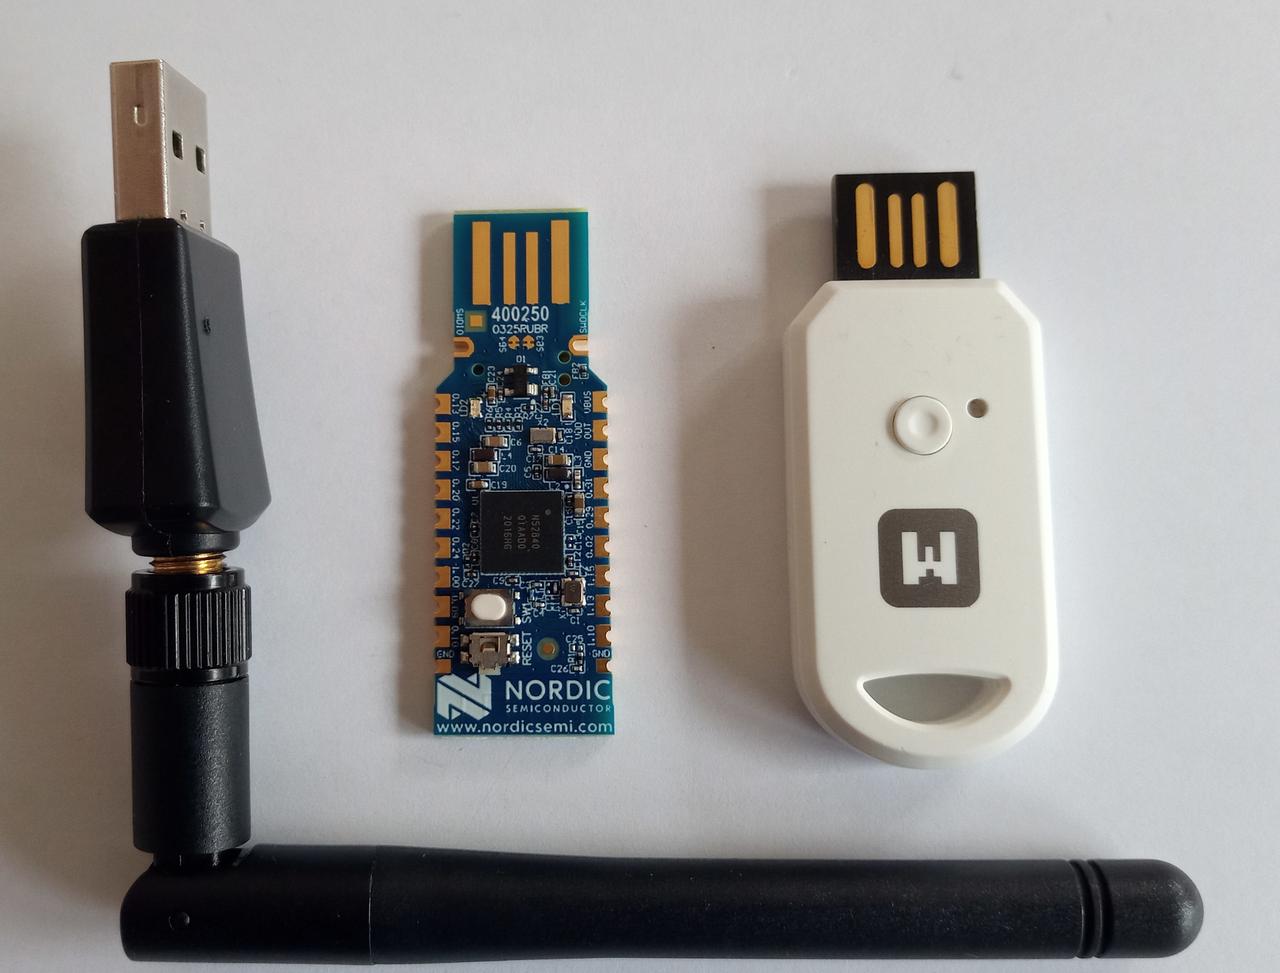
From left to right: April Brother’s April USB Dongle 52840, Nordic Semiconductor’s nRF52840 Dongle, and makerdiary’s nRF52840 MDK USB Dongle.
The more devices you have in a Thread network, the better it works, because Routers can relay messages via other devices. Having more devices also aids in understanding how Thread operates: you can turn devices on and off, run commands on them through Zephyr’s shell, and observe how the network reacts. So, if possible, I recommend purchasing a handful of nRF52840 Dongles or other IEEE 802.15.4 devices supported by Zephyr. A USB hub with several Thread devices plugged in makes an excellent test setup, as shown in this example:
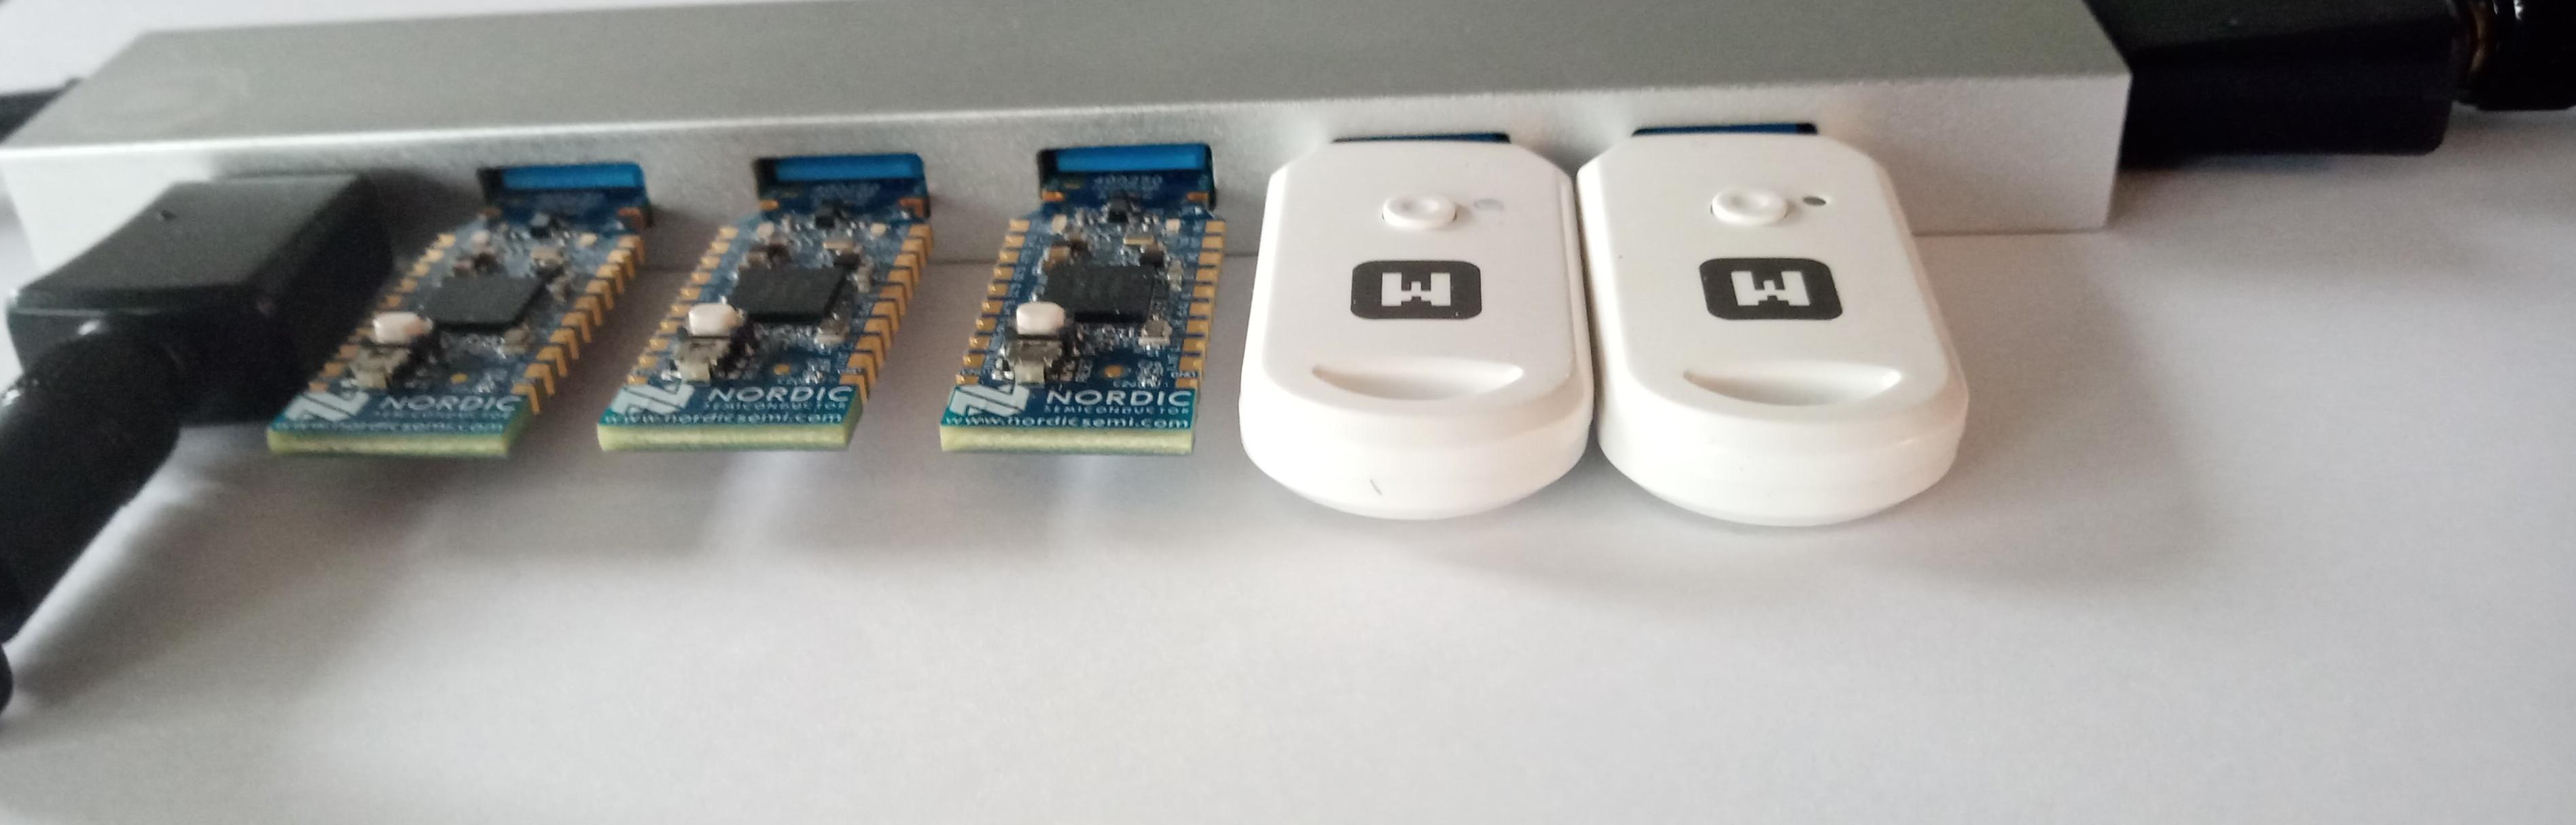
A USB hub with some Thread dongles plugged in is a great test setup to get to know Thread networking.
If you’re serious about Thread development with Zephyr, I also recommend Nordic Semiconductor’s nRF52840 Development Kit. This is the bigger (and slightly less affordable) brother of the nRF52840 Dongle, offering more capabilities to debug code easily. With one of these, you can carry out initial development and debugging then flash the code to the nRF52840 Dongle once all the bugs have been ironed out.
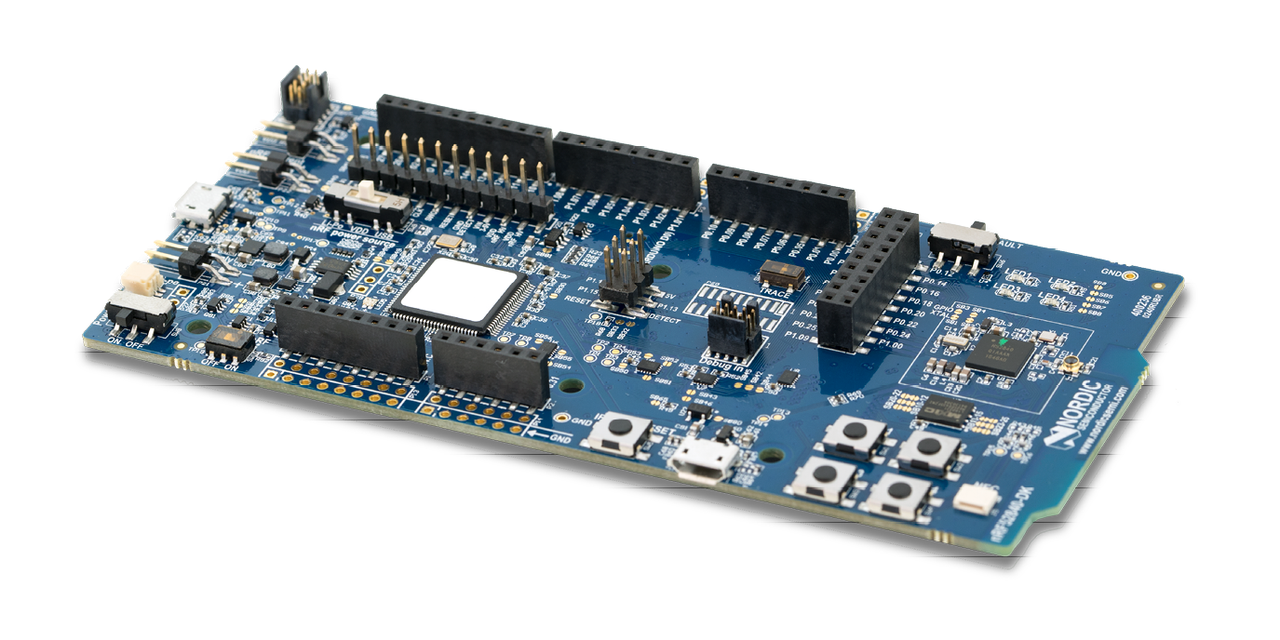
Nordic Semiconductor’s nRF52840 Development Kit has some powerful debugging capabilities. (image source: Nordic Semiconductor)